How To Tie A Bowline Knot
Last Updated on May 19, 2022 by Boatsetter Team
If you’re only going to learn one knot this season, here it is, the bowline knot. The bowline is a very versatile knot. It is used to form a temporary loop in a line that may then put out over a piling or cleat. It can also be used to attach a line to an eye. This knot won’t slip or jam and can be untied easily.
Throughout time the bowline know has had many uses. It was mainly used for securing the weather leech on square sails on large sailing vessels. Today, it’s mainly used as a quick knot for securing a mooring line to a post or as a way of joining two separate lengths of rope together. It’s often known as the King of the Knots.
A good bowline knot won’t slip or slide under load. It’s not perfect, though. When under load, it cannot be tied or untied, which limits its practical usage.
Still, it’s a great knot to know and every sailor knows how to tie a bowline knot.
How To Tie A Bowline Knot:
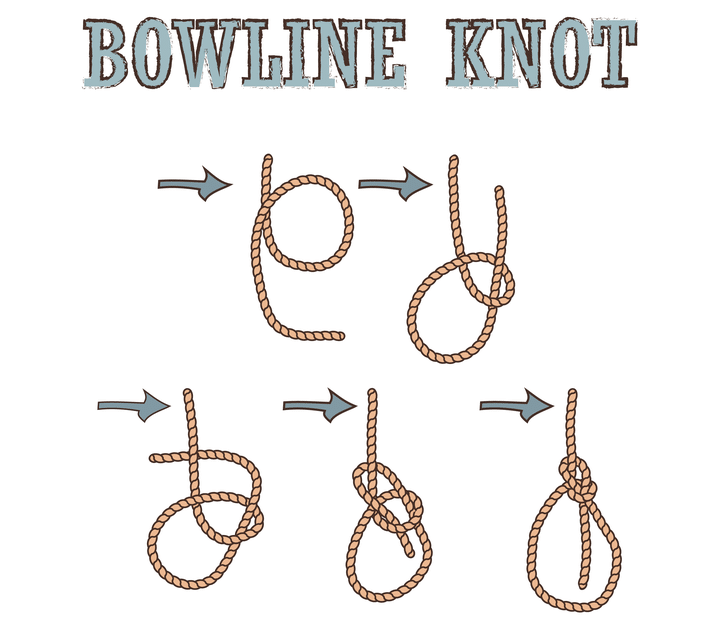
Step 1: Form a small loop on a piece of rope with enough slack left to tie off the knot. Pass the end of the rope upwards through the loop.
Step 2: Now feed the end of the rope underneath the standing rope.
Step 3: Pass the end of the rope through the smaller rope.
Step 4: Grasp the end of the rope with the loop and pull them together.
Step 5: The result is a successful bowline knot.
Now that you know how to tie a bowline, you need to keep in mind before you employ it and a couple of ideas about using it to suit your needs better.
The bowline knot can easily come undone if it’s not under load. If not under proper tension, it can easily shake its way loose. Variations of the bowline, such as the Eskimo Bowline, have slight differences that help it resist shaking loose.
Since bowline knots can be shaken loose under certain circumstances, it’s a wise idea to add a safety knot to prevent any accidents. While it’s not an essential addition for boating, a safety knot is imperative for activities such as climbing. You can add a Double Overhand on the standing end or the adjoining loop quit for added knot protection.
Again, as bowline knots can come undone, it’s always essential to check the quality of your knot and the safety knot. If your knot fails, it could lead to injury, loss of property, or worse. Always double-check your knots.
There is a Left-Hand variation of the standard bowline that many claim is stronger than the regular bowline. The left-hand version has the end of the rope finishing on the left-hand side of the knot rather than in the middle of the loop. The result is a knot that can endure more ring-tension.
It’s a good idea to learn to tie this knot with one hand. It’s quite easy to tie one-handed once you’ve practiced. This is a very useful skill as it allows you to tie a practical knot if you’re unable to use two hands, such as if you’re injured or need your other hand to hold onto something.
Summary of the Bowline Knot
The bowline is an essential knot that every boater should know. It’s easy to make and can be used for a variety of purposes. Since it makes a usable loop at the end of a line or can be passed around an object in the making of the knot, there’s no end to its practical applications.
The most useful knot aboard a sailboat is the bowline. It forms a fixed noose at the end of a line that cannot run or slip and is commonly used to secure sheets to the clew of a headsail. Two bowlines can also be used to connect two lines. The great advantage of a Bowline is that no matter how tight it becomes after being loaded, it can always be untied.
The well-known ditty for tying a bowline runs as follows: “The rabbit comes out of the hole, goes around the back of the tree, and then jumps back into the hold.” The “rabbit” is the working end of the line, the “hole” and “tree” are formed in the standing end. To finish the knot properly, give a hard pull on the tree and the rabbit’s ears at the same time, so the shape of the knot is not deformed. To untie a bowline, turn the knot over and break its back by bending it downward.
Form a closed loop in the line, with the working end passing over the standing end. Pass the working end through the loop, around behind the standing end, then back into the loop. To untie a bowline turn the knot over and break its back by bending it downward.
What is The Bowline Knot Used For?
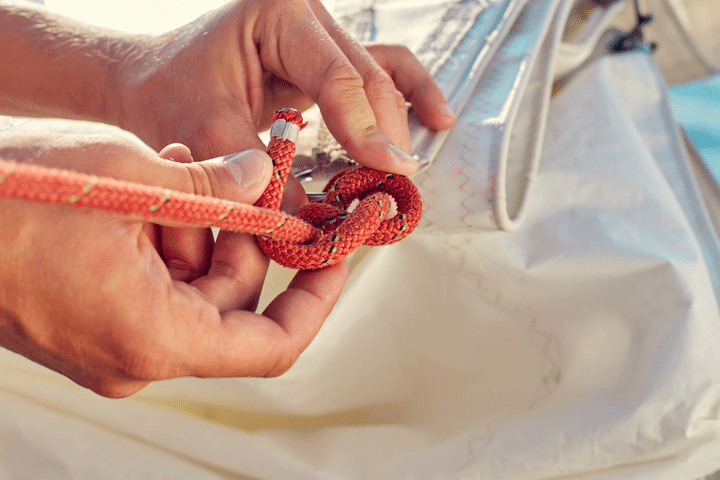
Did you know there are 200 ways to tie the humble bowline? Most cruising boat sailors consider this the king of knots. Make a large bowline at the end of a docking line to pass over a piling. If you fall overboard and your crew tosses you a line, tie a bowline under your arms. That way, they can pull you over to the boat and get you onboard quickly and easily.
If you need to go aloft to the top of your sailboat mast, loop a safety line around your chest and tie a bowline knot just in case that trusty mast halyard fails. And if you find you need to tow another boat, make a bowline in the towline and pass that end to the disabled boat.
These are just a handful of the numerous ways you will find to use this marine knots king.
Marine Knots Lingo
Standing part: the part of a line attached to something like a boat cleat of marina dock cleat. Also, the inactive or idle part of the line.
Bight: a loop in the line. A coil is made up of many bights. Or you could put a single bight in line with one loop.
Bitter end: every piece of the line has two ends or bitter ends. But bitter end also means that part near the end of a line.
Slack: the opposite of taut. To ease or allow some give to a piece of line.
Once you practice the steps of tying a bowline, you will see how easy this knot is to master. There are a few variations of the bowline knot, such as Double Bowline knots and the Running Bowline knot, but you can learn the variations once you feel confident with tying the standard bowline knot.
Conclusion
One of the big advantages of the bowline knot and what makes it such a good knot to know for survival situations is to tie it with one hand. Rather than trust your grip, tie a bowline, and secure yourself.
The first step is to pass the rope behind you and back to your front, so the working end is on the same side of your body as the hand with which you are holding the rope. Choke your grip, so about six inches of rope is hanging loose in your hand. Move your hand over the long end of the rope, down, back toward yourself, then up and out. The rope should loop around your wrist.
Next, wrap the loose six inches around the long end, going underneath than above and back to the starting side. Grab that loose end and pull it through the loop around your wrist. Tighten. If you did it right then, you will end up with a bowline knot looped around the long end of the rope. It might take a bit of practice, but if you ever find yourself in a situation when a rope will save your life, you’ll be thankful for all the practice.

Boatsetter empowers people to explore with confidence by showing them a world of possibility on the water. Rent a boat, list your boat, or become a Boatsetter captain today.

